LibreNMS is a powerful, open-source network monitoring tool that allows you to monitor the health and performance of your devices seamlessly. Adding a host to LibreNMS is one of the foundational steps to begin monitoring your network. This guide will walk you through the process of adding a host.
Prerequisites
Before adding a host, make sure the following requirements are met:
- LibreNMS Installation: Ensure you have a working LibreNMS instance set up. Check the LibreNMS documentation for installation instructions if needed.
- SNMP Setup: The host device (router, switch, server, etc.) should have SNMP (Simple Network Management Protocol) enabled and configured.
- Network Access: Verify that your LibreNMS server can communicate with the host over the network.
Step 1: Accessing the LibreNMS Web Interface
- Open your web browser and log in to your LibreNMS instance.
- Navigate to the Devices section in the top menu.
Step 2: Adding the Host
- Click “Add Device”:
- Locate the “Add Device” button in the Devices section and click on it.
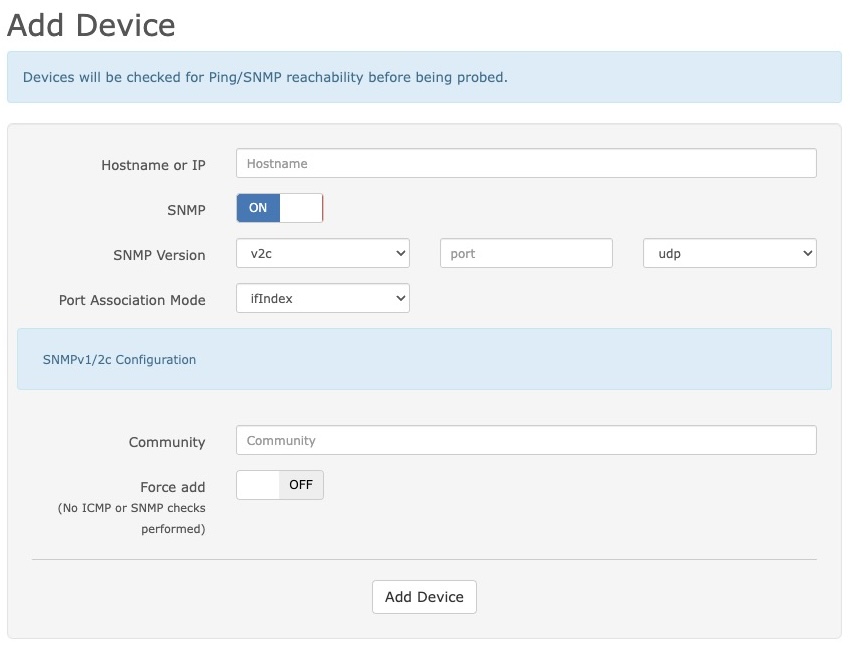
- Enter Host Details:
- Hostname: Enter the fully qualified domain name (FQDN) or the IP address of the host you wish to monitor.
- SNMP Community: Input the SNMP community string. Typically, this is
publicfor a read-only configuration unless you’ve customized it.
- Select SNMP Version:
- Choose the SNMP version supported by the host:
- SNMPv1/v2c: Provides basic features. Enter the community string.
- SNMPv3: Offers more security options. You’ll need to configure authentication and privacy settings such as username, authentication password, and encryption methods.
- Choose the SNMP version supported by the host:
- Additional Options (Optional):
- Set a custom polling interval if needed.
- Add a description or tags for better organization.
- Test Connection:
- Click the Test button to ensure LibreNMS can communicate with the host using the provided details.
- Save Device:
- Once the test is successful, click Add Device to finalize.
Step 3: Verifying the Host
After adding the host, you’ll want to ensure it’s being monitored correctly:
- Device Overview:
- Navigate back to the Devices section, and locate the newly added host.
- Click on the host to view its overview page, which will display essential metrics such as CPU usage, memory utilization, and network traffic.
- Graphs and Metrics:
- Confirm that graphs and performance metrics are populating with data. If no data appears, recheck SNMP configuration and connectivity.
- Alerts:
- Configure alerts for the new host to receive notifications for specific conditions (e.g., high CPU usage or downtime).
Troubleshooting Tips
- SNMP Timeout: Ensure the SNMP configuration on the host is correct and accessible from the LibreNMS server. Use the
snmpwalkcommand from the LibreNMS server to validate:bashCopy codesnmpwalk -v2c -c public [HOST_IP] - Firewall Rules: Confirm that firewalls or security groups allow SNMP traffic (default port is 161).
- Permissions: If using SNMPv3, double-check the credentials and ensure the user has the necessary permissions.
Conclusion
Adding a host to LibreNMS is a straightforward process, but attention to detail is crucial to ensure accurate monitoring. Once the host is added, you can leverage LibreNMS’s robust features to monitor your network and proactively address potential issues.
With this guide, you should be able to add and verify new hosts confidently. For advanced configurations or troubleshooting, refer to the LibreNMS Documentation or join the active LibreNMS community for support.
j2networks family of siteshttps://j2sw.com
https://startawisp.info
https://indycolo.net
#packetsdownrange #routethelight
Discover more from Justin Wilson (j2sw)
Subscribe to get the latest posts sent to your email.
1 thought on “Adding a Host to LibreNMS: A Step-by-Step Guide”
Comments are closed.