I, due to recent SSH vulnerabilities in MikroTik, figured this series of articles would be relevant. The router may have strong passwords and firewall filters, but those services still receive constant login attempts from automated scanners.
For years, the normal answer was a VPN with a management network. VPNs work well, but they require another server, another set of credentials, another client to maintain, and another service that can break during upgrades. With Cloudflare Zero Trust, instead of opening management ports to the Internet, the router stays on a private network while Cloudflare authenticates the administrator before any packets reach the router.
In this article I’ll walk through one way to protect MikroTik management using Cloudflare Zero Trust and Cloudflare Tunnel.
The Overall Design
Instead, a small system inside your management network establishes an outbound encrypted tunnel to Cloudflare. When an administrator authenticates through Cloudflare Access, traffic flows through that tunnel to the router. This way, the router never accepts inbound connections from the Capital I Internet.
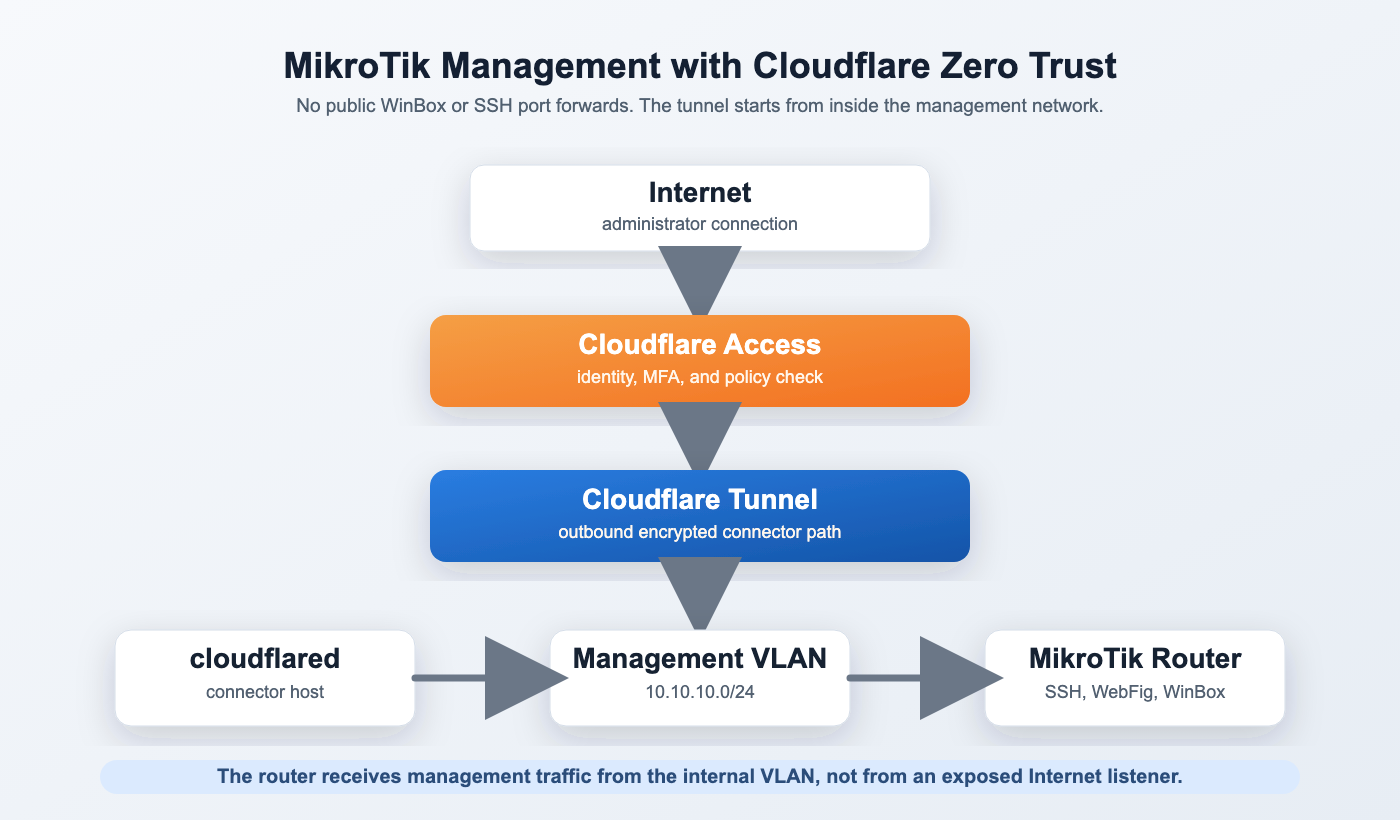
What You’ll Need
The deployment is fairly simple.
- Cloudflare account
- Domain managed by Cloudflare
- Cloudflare Zero Trust enabled
- One Linux VM, Raspberry Pi, or Docker container
- MikroTik router
- Internal management network
The Cloudflare connector can protect many routers. You do not install anything on every router.
Build a Management Network First
Before adding Cloudflare, I like a separate management network on it’s own vlan. If you already have this you can skip ahead.
For example:
Management VLAN

VLAN 100

10.100.100.0/24
Assign the MikroTik management address.
/ip address

add address=10.100.100.1/24 interface=vlan100
Restrict management services.
/ip service

set telnet disabled=yes
set ftp disabled=yes
set api disabled=yes
set api-ssl disabled=yes
set www disabled=yes

set ssh address=10.100.100.0/24
set winbox address=10.100.100.0/24
set www-ssl address=10.100.100.0/24
Even though Cloudflare will eventually provide remote access, limiting the services to your management subnet prevents accidental exposure later.
Installing Cloudflared
Cloudflare Tunnel uses a lightweight daemon named cloudflared.
On Ubuntu:
wget https://github.com/cloudflare/cloudflared/releases/latest/download/cloudflared-linux-amd64.deb

sudo dpkg -i cloudflared-linux-amd64.deb
Authenticate with Cloudflare.
cloudflared tunnel loginA browser opens.
After authenticating, Cloudflare stores credentials locally so the connector can build tunnels.
Create the tunnel.
cloudflared tunnel create mikrotik-managementExample output:
Tunnel ID:

7f8b4f4c-2d58-49c9-b729-xxxxxxxxxxxx
Configure the Tunnel
Create the configuration file.
/etc/cloudflared/config.ymlExample:
tunnel: 7f8b4f4c-2d58-49c9-b729-xxxxxxxxxxxx

credentials-file:
/root/.cloudflared/7f8b4f4c.json

ingress:

- hostname: router.example.com
  service: https://10.100.100.1:443
  originRequest:
    noTLSVerify: true

- service: http_status:404
Install the service.
cloudflared service installStart it.
systemctl enable cloudflared

systemctl start cloudflared
The connector now builds an outbound tunnel to Cloudflare.
Protecting WebFig
Inside the Zero Trust dashboard, create an Access Application.
Application Type:
Self HostedHostname:
router.example.comPolicy:
Allow

Emails ending in

@example.com
Require MFA.
Once configured, browsing to:
https://router.example.comdoes not display the MikroTik login page immediately. Cloudflare first requests authentication.
After MFA succeeds, the request passes through the tunnel to WebFig.
The router never receives an unauthenticated login attempt from the Internet.
SSH Access
SSH works almost exactly the same way.
Cloudflare Access protects the hostname before forwarding the connection.
The Access policy can require:
- Microsoft Entra ID
- Google Workspace
- GitHub
- One-Time PIN
- MFA
You can even require that the connecting computer passes a device posture check before SSH becomes available.
Logging
One of the biggest advantages over a traditional VPN is visibility.
Cloudflare records:
- who authenticated
- when they logged in
- what application they accessed
- what identity provider they used
Instead of looking through MikroTik login attempts from random Internet addresses, your logs contain authenticated users.
What We’ll Cover in Part Two
This article concentrated on WebFig and SSH because they work through standard HTTPS and SSH sessions.
WinBox behaves differently because it is a native application instead of a web browser. In Part Two, I’ll show how Cloudflare’s Private Network feature and the WARP client allow WinBox to connect without exposing TCP/8291 to the Internet. We’ll also cover access policies, service tokens, troubleshooting, and common deployment mistakes that prevent the tunnel from working.
Part 2 will include:
- Cloudflare Private Networks
- WARP client deployment
- WinBox over Zero Trust
- Private IP routing
- Split tunnels
- Troubleshooting
cloudflared - MikroTik firewall examples
- Access policy best practices
- Multi-router deployments
- High availability tunnel connectors
If you found this helpful please donate to my Patreon or Paypal.
j2networks family of siteshttps://j2sw.com
https://startawisp.info
https://indycolo.net
#packetsdownrange #routethelight
Discover more from Justin Wilson (j2sw)
Subscribe to get the latest posts sent to your email.